


I didn’t do it. My 2024 time from last weekend was 1 minute faster than my time from 2023. Excuses first, it came down to not sleeping enough. I slept with my toddler son to help him sleep but when he woke up before 12AM, I couldn’t get back to sleep. I got between 1 and 3 hours of sleep and was awake at least from 2AM for an 8:25AM race start.
I was pretty dejected during the ride as I started to fade knowing that this was the second straight year that I should have beat 1 hour for the race. In 2023, I had two straight low-sleep nights leading into the Challenge; I had done a 100 mile Gran Fondo the day prior at my highest ever 5 hr+ power.
As I now write this over 24 hours after the race, I am feeling OK about things. I am not sure I want to do the event again, but I do want to prove myself on the climb and I could do that any time I feel ready, for free.
- The starting temperature over the weekend was about 10F higher than last year’s, close to 70F. Northern California is in the middle of a heat wave, with temperatures hitting 100F during the afternoons where I live. I didn’t feel overheated during the climb but…
- My strategy to not have water bottles didn’t go well. I had practiced high intensity rides without water for over an hour in warmer-than-race-day temperatures at home, and did just fine. However, within 10 minutes of the ride, my throat was feeling super dry. It might have been particles in the air or related to the heat wave – someone said we had forest fire conditions of heat and dry air. Next time, I’ll just bring a water bottle.
- I hit my max heart rate thresholds quite quickly – I was basically there immediately starting the ride instead of 20-30 minutes into it as I had hoped. I assume my lack of sleep was the big factor there.
- I took beet root in the days leading to the ride to help with time to exertion but I don’t know what impact it had. Beet root is quite expensive in juice form, but I found gummies that are relatively affordable – just $20 for a month’s supply at Costco.
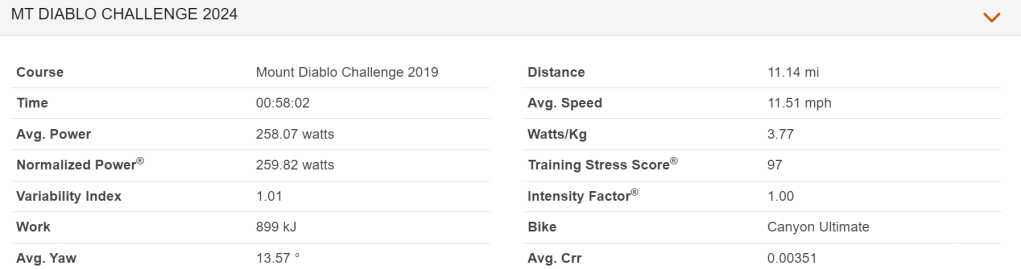
- I lost 5 pounds or so during the final month and I may have lost some power in the process. I didn’t record my full ride correctly so I am unable to compare the last two year’s rides correctly but overall it’s clear I did less power than the previous year but went faster due to less weight on the bike and body.
Moving Forward
- Whether I compete next year or not, I want to focus on losing weight while maintaining current power levels. This means getting down to 140 pounds from my current 146. My power goal would be 255 watts at 4w/kg. I lost a pound a week in the month before the event, and will try to get to 140 by Christmas. My process is sustainable, it is about having self-discipline and tracking myself so I stay on track.
- This type of power/weight ratio would get me up Alpe Du Zwift in 50 minutes. This would give me unwavering confidence that I could beat the 1 hr mark for Mt. Diablo.
- I’ve been having issues with my left foot on my bike setup. I plan to have a bike fit and/or custom insoles fitted to see if that can help with the pressure and pain around the foot.
- I don’t have wishes for the bike. I am now using Dura Ace 9150/9170 parts for the derailleurs and brakes and my original Ultegra 8170 shifters on DI2 11 speed electronic shifting. I have a low weight ZTTO 11-34 cassette and I use Dura Ace 50/34 chainrings with Shimano 105 160mm crankarms. I am on a Fizik Adaptive 3D printed R1 saddle which is about 190G.